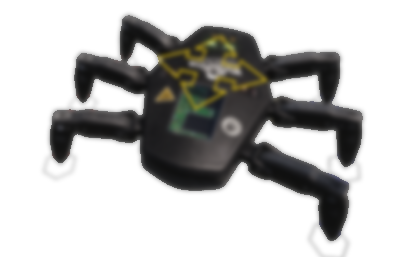
Spider Bot
As a techie, I love Watch Dogs: 2 game where they introduce hacker sub-culture. Especially I adore the little spider bot in the game, and decided to give my own spin to it. In this personal project, I created the bot from concept to gameplay in Unreal Engine 5.
SketchFabTo create this project, I have used Blender for Modeling and UV Mapping, Maya for Rigging, Substance Designer for the procedural texturing of the PCB board, Substance Painter for texturing the robot and Unreal Engine for control rig, animations and rendering.
Please keep in mind that SketchFab above doesn't inherit all the tools for visual candies such as parallax textures, but it is a convinient way to inspect the model, texel density and textures.
3D Modeling
After doodling around for a while, I quickly sculpted a blockout in Blender, before starting to build topology on top of the blockout. Since hackers tend to be show-offs within the game, I decided to put a PCB board in front of the body which is visible under a acrylic glass panel.
After I am done with the modeling, I started working on the UV Maps. I tried as much as possible to keep the UVs clean and have a nice texel density throughout the model.
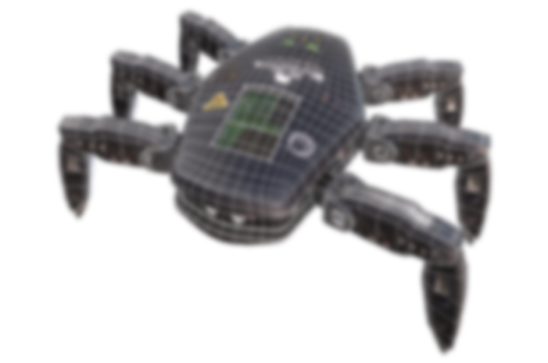
I challenged myself to keep the polygon count as low as possible, even for a cinematic character. The final model has only 11.9k triangles and I believe it still has a nice silhouette. There are some edges causing Quad Overdraw, however I am planning to use this model in a cinematic with unnecessarily close-up shots, so I am not worried about it much.
Texturing
For texturing the robot, I used Substance Painter and Substance Designer to define materials and add shapes to enhance the look and feel. Since the Spider Bot should have been used multiple times in ops, I masked out the edges and added wear, dust and dirt effects caused from sources where no robot have gone before (pun intended). There are total of 6 textures that drive 2 different materials:
- 4096x4096 Base Color - sRGB texture for base color
- 4096x4096 ORM - Channel Packed Occlusion, Roughness, and Metallic linear textures
- 4096x4096 Normal - Normal map for surface details
- 2048x2048 Emissive - Emission map to make it sassy
- 1024x1024 Height - For parallax occlusion mapping of the PCB board
- 512x512 Parallax Mask - Masks out the PCB board to apply parallax effect.

For the PCB board, I decided to create it procedurally in Substance Designer to help me create multiple variations of it. It can generate microchips, resistors, capacitors, and other components procedurally. I also added a few parameters to control the amount of components and the color of the board from Substance Painter. FYI, I don't have the latest version with Portal Node, so sorry about the spaghetti graph.
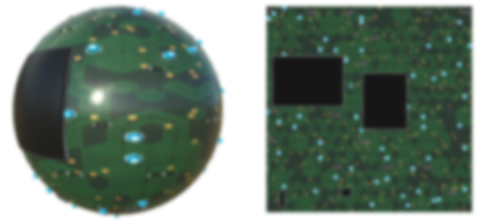
After completing it in the Substance Designer, I imported the published asset into Substance Painter to continue working on the texture set. in FYI, I don't have the latest version with Portal Node, so sorry about the spaghetti graph.
Material Setup
I have created total of 2 master materials to have control over parallax occluded and glass material instances.
By using Static Switches and parameters, I added multiple controls over the textures and their values.
Since both materials share the same textures, it reduces the IO and the memory footprint. Also with the help of Quality Switches I further optimized performance on different settings.
In this step, I did texture iterations to have a better look and feel within the Unreal Engine.

For the robot body and legs, I used my Parallax Occlusion Surface master material.
This master material includes the generic PBR inputs and various controls over them. With textures are already exposed in master material, I can create multiple skin variations of the robot, utilizing the material instances.
For the PCB board, I used parallax occlusion mapping, which makes it look like the components are extruded from the board. I have added a static switch to enable/disable parallax occlusion mapping feature. Utilizing the Quality Switch here as well, disabling parallax completely on low-end devices.
Instead of making the whole Spider Bot material translucent, I have created a glass material to prevent unnecessary translucency rendering for the acrylic glass of the Spider Bot. I have used the same textures used in the body to prevent more texture samples since they are already loaded cached in the memory.
The master material also accepts colors and normal maps etc. for additional detailing.
Rigging
For the rigging, I used Maya since it feels the most convinient way to do rigging to me. I only created the bone structure and painted the weights. I decided to create the Control Rig within Unreal Engine. Since I am sick of Maya crashes.
Through the Control Rig, I used BasicIK solvers to have complete control over each leg and used Sphere Trace from each feet to the ground to find a proper position for legs to step on surfaces.
Animation
I have created several character animations with the Control Rig I made before, all within Unreal Engine Sequencer. It has been a while since I animated something myself, and hexapod animation was hell of a challenge.
- Idle - Idle animation for the character.
- MoveForward - Hexapod walk cycle. Reverse can be used.
- MoveRight - Hexapod right movement.
- MoveLeft - Hexapod left movement.
- JumpStart - Jump start animation
- JumpLoop - Jump loop animation. Also can be used for falling.
- JumpEnd - Jump end animation for character land.
After completing the animations, I blended the movement animations using the Blend Space and weighted the Control Rig within the Animation Blueprint.